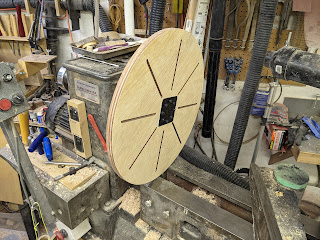
I am not sure what I should call this tool as it's not really a Cole chuck and its also not a Longsworth chuck so I call it a "Faceplate chuck".
It is used to hold a bowl, bottom out, for finishing the foot. I have a vacuum system but wanted something simpler to set up and use. Sometimes out of round and leaky vessels make a vacuum chuck a challenge.
I also wanted to get more experience designing and routing using my CNC machine and this seemed like a good learning project.
The Design
The design. The plate is 16" in diameter (the swing on my Stubby with the bed in the home position).
The 8, .25" wide fastener slots are routed through the material every 45 degrees. The slots start 1 inch inside the perimeter and end 2.25" from the center.
The plate is designed for a 2" faceplate, specifically this one: https://amzn.to/3nn52VZ
There is a recess milled into the plate so that the faceplate can be located accurately on the center of the plate.
The plate was then cut out of Luan using this bit: Freud 75-102: 1/4", 2 flute carbide bit https://amzn.to/3nxaXbj
I used Fusion 360 for the CAD-CAM and drawings.
Faceplate Attachement
Front Pressure Plate
I made the front pressure plate from 1/8 inch aluminum scrap. I cut it with my favorite nibbler and used the template for hole placement.
Drilling the Plate Holes
I took extra precautions to drill the plate accurately. The challenge is that there are 8 radial placed holes that are dangerously close to the perimeter of the faceplate. A small deviation from the center and/or improper spacing meant the screws would not align with the pressure plate and the faceplate. There is no tolerance to enlarge the screws to account for misalignment. |
| Grinding a point |
 |
| With the faceplate in the recess, one awl tapped through the hole and into the wood plate. This awl pins the faceplate in place while the other holes are marked |
 |
| The second awl was used to mark the remaining holes while the first awl is left in place. |


No comments:
Post a Comment