Showing posts with label Woodturning with Sketchup. Show all posts

Thursday, April 9, 2009

Unity Candle

 
The unity candle project has started. 
The model above was done using the Virtual Lathe in "Woodturning with Sketchup". 

Saturday, November 22, 2008

Christmas Ornaments

I noticed that at the holiday time everyone likes to turn "inside out" ornaments.
So I decided to see if you could model it.
Below is my first try. Haven't yet figured out how to turn the outside profile.

Friday, August 22, 2008

Modeling "Leaf Extraodinaire"


In this months issue of American Woodturner Tim Yodler teaches us how to turn a "German Ring turning".

I couldn't leaf this idea alone, I just had to try and model it. I haven't tried turning it yet but I think that turning is way harder than modeling it.

This model made my PC groan! Below are some hints on the process.

The finished model
 
Turn it on the Virtual Lathe
  • Imported a leaf graphic to use as a model.
  • Draw with line tools over it on the grid insuring it was "closed".
  • Then "turn it" on the virtual lathe

Getting the 1/8 section
  • Group and copy the entire turning to the right of the lathe
  • Insert 4 panels into the truning to create the angled surfaces
  • Select it all and ungroup every thing
  • With it all selected "intersect" it
  • Delete all the surfaces except for one 1/8 section 
Getting the 1/8 section

That was fun! Now I need to turn one, not so easy?

Donnie

Sunday, August 10, 2008

Holy Water Font


I just completed the Holy Water Font. Above you can see the model and the finished project.

This project included many disciplines, woodturning, inlays, guilding and metal spinning.
In this post I will focus on the modelling part of the project. Turning details can be found at Turnedoutright.com.


View Extents
Above you can see all the objects of the model. The main part of the models object can be seen on the virtual lathe. These parts were assembled and colored to the right.

Turning at the Virtual Lathe

Seen in this close up all the components were modeled in the round. Then the halfmoons (lower right and left of the back) were subtracted from the back by intersecting 3D circles with the model. Note: I decided not to use these in the real model. Also the ring that held the AL dish was designed with a solid bottom but I made it an open ring during turning since I was afraid it would retain water.

The Rings
The rings were also modeled in 3D. I decided to use the flat model on the right for the actual carving but used the 3d version on the left for the model printouts.

The AL Dish
This story stick printed full scale was used to make the spinning mandrel.

The Final Assembly

Above you can see the final assembly, where the fit was tested.
More turning details at www.turnedoutright.com


Go buy the book "Woodturning with SketchUp"

Sunday, August 3, 2008

Here is a challenge for you!


I did this staved vessel model using SketchUp.

Let me know if you figure out how to do it or one beter. I'll post your accomplishment.

Monday, April 14, 2008

SketchUp Recognizes Woodturning

This week we got an awesome mention in the SketchUp blog.

This is great exposure toward the advancement of "3D Woodturning Modeling".


"I was just alerted to the presence of a really neat blog about using SketchUp for woodturning. It's called Turnedoutright, and it's worth a look -- even if you're not a woodturner yourself. The SketchUp models are outstanding."

Thanks to Aidan Chopra


The Music box is completed, watch for final post on the project.

You can get a copy of the "Woodturning with SketchUp" @ the turnedoutright store.

Monday, March 17, 2008

Music Box Lid: Chip carving


The music box project is progressing along as planned.

I got to the point where the lid was turned.

I was pleased with the lid but realized that some surface treatment would add a nice touch.

So I went back to SketchUp and modeled a pattern to carve on the lid.

IT WAS EASY TO DO:

  • Draw out a circle the size of the lid, this also provides a drawing plane
  • Add an internal circle that matches the center (not to be carved) of the lid.
  • Divide the circle up with the protractor into four quadrants
  • Use SketchUp drawing tools to make a pattern in one quadrant
  • Then copy and flip it into the other quadrants.
  • Print full size
  • Lay over lid and trace the pattern with graphite paper
  • Carve away!


Soon I will post the completed project on turnedoutright.

Donnie

Saturday, March 8, 2008

Tip: 3D story sticks

Last night while I was finalizing the music box plans I discovered an easy way to make a story stick on the virtual lathe that is actually a full size 3D cross section.

The following instructions assumes that you have read the book "Woodturning with SketchUp" available on turnedoutright.

To review, one of the useful things to do after you competed your computer design is to print a full scale drawing of the turning. This story stick allows you can take measurements directly with your caliper. I don't like to have to do math when I'm standing in front of the lathe, no not even multiplying by 2x :)

Normally I print a cross section view (requires that I multiply measurements by 2x) or a 3D view (doesn't show internal dimensions) and go to the shop.

Better approach:
  • After drawing the cross section make a copy to the right of your original and render it in 3D, all on the "grid background".
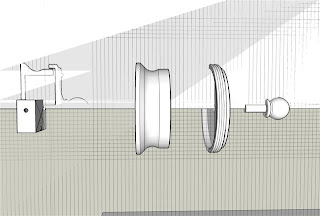


  • Then click on the cross section tool [Menu: tools/section plane] and drag it to the "Grid Background" plane and click on an intersection of the grid lines. This will put the crossection on the same plane as the grid and therefore it will show up on your story stick.
  • SketchUp will slice the rendered pieces at the centerline of the lathe showing internal and external dimensions in full scale.
  • Print full scale and take to the shop.
  • Now all your measurements can be taken directly by setting your caliper to match the drawing.
Donnie