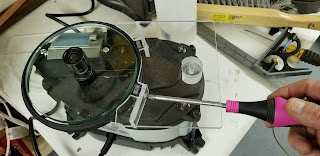
Since I also need to make a Tool Bar Attachment I figured that is would be worth the time to see if I could interface to the mounting slots on the side of the WS3000. I believe these are the slots used to mount the factory version.
Design
I decided to make a platform that connected to the mounting slots on the perimeter of the WS3000 circumference. I decided that 1/4" acrylic would be a strong and easy to work with material. Its transparency would help me locate WS features under the table.
I think that acrylic will wear OK since the tool will normally sit static in its holder on the plate and not really move much while sharpening. We will see?
 |
| The completed assembly shown upside down |
The design ended up being 9 parts.
- 1x Base plate: all other parts are mounted to the plate. Its surface is aligned to the sharpening disks surface. (see attached outline below)
- 1x Rear adjuster: functions as a stabilizer and adjuster. Turned from a scrap block of acrylic. A 1/4-20 hole is tapped in its center and a set screw installed. A flat was ground on one side to account for an interference with a feature at the rear of the WS3000
- Height = .9"
- Diameter = 1.14"
- 1x 1/4-20 set screw: adjusts the rear of the plate up-down.
- 2x mounting flanges: these 1/4" acrylic flanges are glued perpendicular to the plate. These flanges secure the entire assy. against the surface of the mounting guides
- L= 2"
- H= .93"
- 2x Nut Plates: these 1/4" acrylic nuts with 8-32 threads are inserted into the mounting guides
- W = .43"
- L= .9"
- 2x 8-32 mounting screws: these screws fasten the entire assy. against the mounting guides using the nut plates.
Notes:
The dimensions above are taken off my final unit most dimensions are not critical
The location of the mounting screws vs the mounting slots IS important
Outline Pattern
This turns out to be a pretty simple design and could be easily CNC or laser cut. Since I am only doing one I did not put this design into CAD form. The tough part is getting the slots located and spaced on the circumference of the WS3000. I traced the outline of the base plate to get you started. I think if you download and print 1-1 this should print actual size.
Adjustments
Use a square laid across the disk to set the height of the plate. The plates front is adjusted by loosening the front mounting screws moving the plate to position an then re-tightening them.
The rear is adjusted be inserting an hex wrench into the adjuster hole and adjusting the rear of the plate.
Advantages
- Cost and availability
Disadvantages
- The need to re-adjust each time the assembly is removed. [I plan to make a precision spacer that helps set the height of the plate]
- Potential wear of the plates surface?
Fabrication Details
 |
| Initial layout glued to acrylic |
 |
| After cutting at the band-saw |
 |
| Lining up the mounting flange with nut plates |
 |
| Gluing the plate on the top of the mounting flanges |
 |
| Weight provides stability while the glue sets up. Note the glue. |
 |
| Glue dry! |
 |
| Turning the adjuster. Doesn't need to be this pretty, any block would work |
 |
| Adjuster glued and held in place with a 1/4-20 nut |
You can donate by clicking the "DONATE" button in the upper right of this site.
Enjoy and Comment,
Don


No comments:
Post a Comment