Monday, January 28, 2019

DIY Worksharp Accessories

Accessorizing the WS 3000

I recently bought a Worksharp WS3000. I was thinking about how to build one but the price on Amazon suggested it probably wasn't worth the hassle and my time away from my other projects.

That said, I found the accessories to be pretty expensive and the tool bar attachment is no longer available.

Diamond Lapping Plates

DMT sells a sharpening and honing kit for the WS3000. The kits use a 6" diameter lapping plate. The lapping plate is held onto the glass disk with a sticky back magnetic sheet (like a refrigerator magnet. These are pricey, on amazon for $65 + shipping.

I started to covet this accessory but then found that McCauley had already figured out a replacement using stock Amazon parts.

These parts are on order to try this system out...
3000 grit Diamond coated sheets  (don't waste your money on this)
About $40 total. I will report back after testing this system

I used the above setup to sharpen a plane's blade. All of the disks worked perfectly except the 3000 grit.  It immediately scored the disk and the planes cutting edge.


I have found an alternative 3000 grit lapping plate that albeit more expensive it got better reviews. It is included in the parts kit I created.

I also found that the magnet sheet is not really necessary. Putting the lapping plate on the spindle first and then the glass plate on top works fine.

I ended up using the magnet sheet to hold the lapping plates on the wall near my sharpening station :)!

Lapping Disk Kit

I built this kit of parts for this build. If you use this kit to buy your parts I make some affiliate $ and it costs you nothing.

Worksharp-3000-lapping-upgrade Kit

Other WS3000 Accessories

I also made these accessories:


Additional Disks

Tool Bar Attachment [I will make this if I have trouble sharpening my carving gauges]

If you enjoyed this project/post or my blog consider donating which funds more tool and materials.
You can donate by clicking the "DONATE" button in the upper right of this site.

Enjoy and please comment,
Don

WS3000 Wide Tool Rest


The wide tool rest is $70 and was out of stock in most places I looked. I wondered how hard it would be to fabricate a shop made equivalent.
Since I also need to make a Tool Bar Attachment I figured that is would be worth the time to see if I could interface to the mounting slots on the side of the WS3000. I believe these are the slots used to mount the factory version.

Design

I decided to make a platform that connected to the mounting slots on the perimeter of the WS3000 circumference. I decided that 1/4" acrylic would be a strong and easy to work with material. Its transparency would help me locate WS features under the table.
I think that acrylic will wear OK since the tool will normally sit static in its holder on the plate and not really move much while sharpening. We will see?

The completed assembly shown upside down
The design ended up being 9 parts. 
  • 1x Base plate: all other parts are mounted to the plate. Its surface is aligned to the sharpening disks surface. (see attached outline below)
  • 1x Rear adjuster: functions as a stabilizer and adjuster. Turned from a scrap block of acrylic. A 1/4-20 hole is tapped in its center and a set screw installed. A flat was ground on one side to account for an interference with a feature at the rear of the WS3000
    • Height = .9"
    • Diameter = 1.14"
  • 1x 1/4-20 set screw: adjusts the rear of the plate up-down.
  • 2x mounting flanges: these 1/4" acrylic flanges are glued perpendicular to the plate. These flanges secure the entire assy. against the surface of the mounting guides
    • L= 2"
    • H= .93"
  • 2x Nut Plates: these 1/4" acrylic nuts with 8-32 threads are inserted into the mounting guides
    • W = .43"
    • L= .9"
  • 2x 8-32 mounting screws: these screws fasten the entire assy. against the mounting guides using the nut plates.
Notes:
The dimensions above are taken off my final unit most dimensions are not critical
The location of the mounting screws vs the mounting slots IS important 

Outline Pattern

This turns out to be a pretty simple design and could be easily CNC or laser cut. Since I am only doing one I did not put this design into CAD form. The tough part is getting the slots located and spaced on the circumference of the WS3000.  I traced the outline of the base plate to get you started. I think if you download and print 1-1 this should print actual size.

Adjustments

Use a square laid across the disk to set the height of the plate. The plates front is adjusted by loosening the front mounting screws moving the plate to position an then re-tightening them.
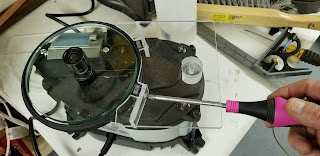
The rear is adjusted be inserting an hex wrench into the adjuster hole and adjusting the rear of the plate.

Advantages


  • Cost and availability

Disadvantages

  • The need to re-adjust each time the assembly is removed. [I plan to make a precision spacer that helps set the height of the plate]
  • Potential wear of the plates surface?

Fabrication Details

Initial layout glued to acrylic
After cutting at the band-saw

Lining up the mounting flange with nut plates
Gluing the plate on the top of the mounting flanges

Weight provides stability while the glue sets up. Note the glue.
Glue dry!


Turning the adjuster. Doesn't need to be this pretty, any block would work

Adjuster glued and held in place with a 1/4-20 nut


If you enjoyed this project/post consider donating which funds more tool and materials.
You can donate by clicking the "DONATE" button in the upper right of this site.

Enjoy and Comment, 
Don

Saturday, January 26, 2019

New Years Resolution Phase 1: Two bee or not two bees

Phase 1: Practice Carving the Bees

New years resolution! 

Get back to a long imagined plan to advance my woodworking skills and combine them into unique pieces.

Goal: 
By the end of the year show a combination piece consisting of:
Woodturning + woodcarving+ pyrography + CNC + flatwork.

Setting up the shop for carving

Of course this is and excuse to buy some tools and ways to properly store them.
I already have a turbo carver and a set of palm chisels but lacked a set of decent full size chisels.
I found Mary May's Woodcarving and this was a great refresher. I will be back to this resource to get advanced instructions. The basics were free and the videos were very well presented.
That site directed me to Chippingaway where I bought the beginner set of chisels. This was the best price I could find for Pheil tools and Mary May had pre-selected a starter set.

I then built a case for the chisels that allowed me to hold the chisels while carving as well as store them. These tools are a dream to use. Now I have to hone my sharpening skills on a new set of tools. Uggh I hate it when that happens!
I used my bench bull laid flat on the bench to increase the height of the bench (aching back) and that helped make the hand carving more enjoyable.


This project combines flatwork+woodcarving+pyrography

I carved this Bee scene into basswood as practice since I have been way from carving for N years. The bee image came from the web. To make a flexible template I attached a paper copy of the bee to the sticky side of a piece of sticky back foam, the kind you get at Micheal's. Then I cutout the bee from the substrate with an xacto knife. This provides a robust pattern that can be formed around curved surfaces and traced.
The B was copied on my printer...

The copy was pressed onto the back of this foam material
Add caption
Roughed out
After finish and sanding
A hexagon was cut from thick Vellum and glued to the end of a stick.
The stick holds the hexagon on the surface while a pencil is used to outline it.

Waiting to burn the hive in the background

The Final Countdown

Hive burned into the background

Color added with colored pencils that are dipped in turpentine

Next steps

My plan is to carve this same scene, up around the mouth, on an aspen vessel .

If you enjoyed this project/post consider donating which funds more tool and materials.
You can donate by clicking the "DONATE" button in the upper right of this site.

Enjoy and please comment,
Don

Thursday, January 17, 2019

Standard Tripod Camera Boom

Shop Made Tripod Camera Boom

Occasionally I capture work in my shop to share on this and other blogs. I like to use my Samsung phones camera because it a good camera and Google Photo's automatically uploads them on wifi so then I can manage and modify them on my PC at a later time.
I also like that I can snap shots by voice "Capture" if my hands are occupied.

POV

Point of View shots are hard to get so I set out to research products and methods to get my readers a better view. From the research I decided to try out a boom that held my phone. After getting some inspiration from others that used microphone booms that adapted to the standard tripod I decided to make a setup like that in the shop.

The Design

An old metal broom handle (I wondered why I was keeping that) held into the tripod by a wooden adapter with a PVC counter weight will allow me to position the phone above my work at differing angles and positions.
Another adapter connects the phone to the end of the boom, safely I hope.

Fabrication

The entire contraption

Boom attachment & adjusting bracket
Counter weigh (PVC pipe full of rocks) in background

The adjustable phone mount

Details of the phone mount
Note the grey foam to the right of the phone.
It serves to keep the phone tight against the shoulder screws on the left. The screws are out of view under the left rubber band.
Acrylic glue was used to affix the sides of the clear mount.

Testing

Now I just have to try it out on some project. If it works well I may buy a more professional setup but for now its just the right price.

If this post is a help or inspiration to you then consider donating! 
Donations help buy new stuff for the shop!
The donation button is on the upper left .....

Enjoy and comment,
Don K